
The Adam West Batman tv show is my guilty pleasure and I've always wanted to be Batgirl. This costume is violently purple and sparkly. I couldn't find a good tutorial for this one, so I made a lot of it up as I went. I rather like to call this the costume of 1001 pieces, or so it seemed. Originally I started making this for Madison Comic Con because Adam West and Burt Ward were going to be there. Unfortunately they cancelled, so I slowed up the work on my costume, and instead I had it finished for Phoenix Comicon.
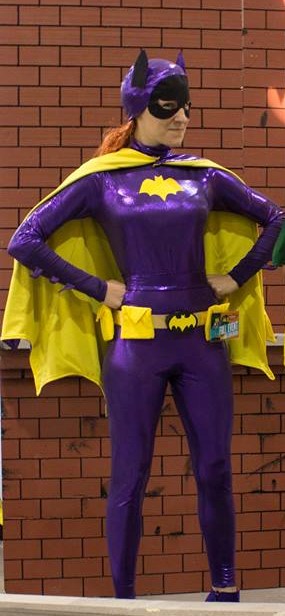
A picture of the real glorious costume follows:

Yvonne Craig as Batgirl. I do not own this image.
Bodysuit

(Yep. I wore that.)
This is definitely the easiest part of the costume to make. Very few pieces and quick, straight seams. I looked for a superhero costume pattern, but was unable to find one. I ended up using the pattern below that I found on etsy.

(The scariest part is that this isn't a costume)
Fabric: All the sparkly spandex!! I waited until I had a 60% off coupon from Joann's because it is not cheap fabric to start with. Make sure you get some extra for the cape and accessories!
Alterations: None to the actual costume. An addition of a batgirl symbol patch.
I used pattern view B so that the zipper was in the back. Sew up a lovely, violet, sparkly body suit and your base costume is set to go! Now to add the patch.

(Seriously, why was it blue?)
The symbol I traced onto the back of a yellow iron patch, cut it out, and ironed it on. The hardest part was getting the symbol just right. And centered.
Cape

(So shiny)

(Flip side)
The cape I did not have a pattern for but since it's a modified circle, it's not too difficult.
Fabric: More sparkly purple spandex and some sort of yellow. In the show, it's a yellow satin, but I chose a stretchy yellow since it was much cheaper.
First decide how long you want your cape to be. My decision was made for me because my boyfriend and I bought a large piece of yellow and cut it down the middle, half for his Robin cape, half for my Batgirl cape. The length of your cape should just be determined by your height. In other words, you want it to cover your butt. Once you have your length determined, use that as a radius, and make two half circles, one purple, one yellow. Then, determine the number of cutouts that you want around the edges. I marked mine evenly with my tape measure instead of trying to wing it like I normally would. Then take out a half circle for your neck. This I measured just by using my neck as a guide.
From there, right sides together, pin and sew almost all around. I left the neck open and turned it right side out through the neck hole. Next, I top stitched all the way around the entire cape and folded over the rough edges at the neck to close the hole.
I wanted to have seams running down from the neck to each point, which proved more difficult that I had anticipated. If you don't want to include this step, you're basically done!

(It just looks fancy with it)
Here's where more math comes in. Measure around the neck hole and divide it by the number of points your cape has. Mark that number of dots evenly along the neck. Then, either with a pencil or something else erasable, draw light lines using a straight edge from each dot to the corresponding point. Do not use a pen like I did. I drew wrong lines twice before I finally got it right and if you look closely at my cape, you can still see the incorrect lines. After your lines are drawn, sew with purple thread up the lines from dot to point.
Lastly, add in a clasp and you're good to go! Put it around your neck and run through your house.
Accessories
Bodysuit and cape done? Great, you're not even close to done! Next up, bracers.

(Top right side out, bottom inside out)
I apologize now for not having in progress pictures since I have no pattern for these and it would probably be much easier to see it than have me explain it. Now technically Batgirl wears gloves, but I didn't have the ambition to make gloves, so bracers it was!
Fabric: Sparkly purple scrapsThe actual bracer size itself I determined by using paper as a pattern and measuring my arm and the length I wanted the bracer to cover. I used the flip side of the sparkly fabric to have contrast between my purples, if such a thing is possible. Before sewing the bracers shut however, you have to add the little...thingys...for lack of a better term. I made my spikes (?) by freehanding a shape on some paper and then tracing that shape 12 times onto the purple fabric. Yup, 12 times, 2 for each spike, 6 finished spikes in all. Make sure you make them longer than you'd like since part of the bottom will be lost in the seam. Trace 6 one way, then flip over your pattern and trace 6 the other way. After cutting them out, pin them non sparkly side together and sew them up, leaving the bottom part open. Flip them all right side out. Then, pin them into what will become the seam of the bracer. In the bottom bracer in the picture listed above, the spikes are to the inside, which is where you'll place them to sew them inside. Flip them right side out and try them on and make sure the spikes are placed where you'd like them before you sew them in. Hem up the bracers before sewing them shut. Put on your arms and feel like a crimefighter.

(Belt number 1!)
The first belt is the utility belt. Above it is pictured without an pouches. The belt itself is made out of shiny gold trim that I found at Joann's measured to the size of my hips and closed with velcro. The buckle I made out of a small decorative heavy cardboard box lid that I also found at Joann's. I spray painted it black and glued on the symbol which I cut out of a yellow spiral notebook cover.

(Again, drawing the symbol took the longest on this)
I used more notebook cover to create a tiny box to place between the "buckle" and the belt and glued that sucker together. The pouches took more time.

(Not exactly the same size, but close)
My pouches are made out of yellow felt because that's what I had laying around, but covered on the front with leftover cape fabric so that they would match the outfit better. I cut out the general piece for the pouches and then sewed on a piece of extra yellow to what would be the front and the front flap. This can literally be pieced together since no one will see the back. Feel free to use whatever fabric you'd like.

(You can see the plain, uncovered felt)
Once you have your basic pouches sewn up, hand sew loops on the back cut to fit your utility belt size and add velcro to the front of the pouches so they stay closed. Slip them on to the belt and you're ready to go!
Belt number 2 doesn't really serve a purpose but I wanted it anyway.

(Does not look like much)
Since the bodysuit gives you no waist, and Batgirls tapers around the waist, I made a small belt to go around my proper waist in addition to the utility belt around my hips. All I did was sew sturdy interfacing into the sparkly fabric, measured my waist, added velcro and away I went. I wasn't entirely sure if I'd even use it, but I did in the end.
Cowl and Wig
Oh god, here it is. The part that nearly sent me into a nervous breakdown.

(So much unhappiness)
The bodysuit pattern I used also came with a hood pattern. I have no idea why, but it did and I used that as a basis for my cowl.
Fabric: more of that damn sparkle crap and some plain black
Alterations: all of them
First step, get yourself a nice bowl of salty or chocolately goodness. You're going to want it.
Step two, make a hood. So far so good. Now we get weird.
To make the mask, I looked at tons of pictures of Yvonne Craig in her cowl to determine shape, size etc. Eventually I drew it out on paper, using my face as a guide. Then I cut it out and traced it onto the black fabric, and cut out my mask. Since hemming this would suck royally, I recommend using a few layers of fray check on all edges. Works like a dream, makes like way easier.
Next, determine where you want the cowl to end at the back of your head and chop off the bottom of the hood. I really advise using actual measurements here unlike how I did it. Measuring will make it much easier in a few steps. Then, decide where the mask and the top of the cowl should meet and pin on the mask. Put it on your head after pinning to make sure that's where you like it. Sew it on and trim it up.I didn't want a strap or anything to hold it on, so I just sewed it up tight enough to stay on my head. To do this you'll want to experiment with pinning it in and sewing seams up the back to fit your head. You will definitely already want your wig on your head before you start this since the wig is a different thickness than your own head. See my note about the wig below.
Hem around the whole cowl.
Now the ears...I also had no pattern for these...big surprise.

(Just look at the evil thing)
For the ears I again made a paper pattern of the size that I wanted and then traced it out on the black fabric and the sparkly devil's plaything, leaving room for seams on all sides. Then I sewed them, right sides together, leaving the bottom open and flipped them right sides out. I chose to purple topstitch around the edges, but you don't have to. Then I cut cardboard from my already mutilated notebook cover to fit inside each ear so that they stand up nicely. Don't crunch them!
In order to place them on the cowl you will need a good dose of extra sanity and a friend. Put on your cowl and while looking in a mirror place one ear to your desired location on the side of your head. Have a friend either pin it while it's on you (trust is the key), or carefully remove the cowl while holding it in place. Pin it on and made sure it's where you want it. I hope you measured on the hood because then you can just place one ear and measure the other side to make them even. I did not measure, and therefore the sides were not even to begin with and I had to place both ears attempting to make them even on my head and of course moving them every time I tried to get a pin through. Let's assume that you have both ears placed in a timely manner and with no temper tantrums. Then top stitch with purple thread around the bottom of the ear and up the sides a little ways so that they don't fall over, but also do not bend inward. It takes a little trial and error. If you've gotten to this step allow me to shake your hand.
The wig! If you have red hair, you're ridiculously lucky and you may also skip this part. If you are going to be needing a wig, I for once suggest a cheap one because chances are you're going to murder it. The wig I bought was way too poofy in front and did not fit under my cowl nicely at all. I found the threads holding the individual strands of hair on and ripped out several layers until I had a half bald mullet wig. I'm not putting a picture of it up. Too ugly. But! It now fits perfectly under the cowl and the long layers of red hair come out the bottom of it. All done.
Boots

(They really are purple, I swear)
Now these are my best find ever. I searched everywhere for cheap purple boots, and I finally hit on this lovely pair for $15 on amazon. They're actually the most expensive part of the costume. But they look great! I had a woman at Con ask me if I had them made especially for my costume. Bahahahaha.
All Done! (Finally)

(Batgirl and Robin)

(Taking Catwoman to jail)

(Bat-signal)
AWESOME JOB!
ReplyDelete